Settings
Audio
Please see Signal Path on how audio is passed through the app.
Device Volume
This volume slider controls the volume of your iPad device. It corresponds to the hardware volume keys. If an AirPlay or Bluetooth destination is found in the network, an icon will be shown at the right side of the slider. Clicking on the AirPlay icon will open a popup window where you can choose a destination device which will be used for audio output.
Note
When AirPlay is activated, the volume slider will have no effect on the output volume. If you use a USB audio interface or have enabled the setting Combine USB & Headphone Outputs, no volume slider and Airplay icon will be displayed.
When using Bluetooth or Airplay, Stage Traxx will automatically detect the current latency of the audio output and offset all scrolling and MIDI commands by this latency.
Master Equalizer
The master equalizer can be used to optimize the playback for your room and PA system. The equalizer can operate either as a 8-band graphic equalizer or a 6-band parametric equalizer:

The equalizer can by switched on and off and the gain slider can be used to compensate for bigger boosts or cuts. It will change the overall playback volume.
Warning
Strong boosts especially in low frequencies can produce distorted output. Should that happen, reduce the overall gain on the Master Equalizer until the distortion is eliminated.
In parametric mode, the low and high bands are shelf filters. The 4 middle bands are fully parametric with following options:
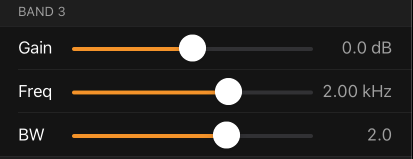
The frequency range for each band can be between 20Hz and 20kHz. The BW slider changes the bandwidth of this band. A bandwidth of 1 means that the equalizer band will affect a frequency range of 1 octave.
The ![]() icon on top of the screen can be used to reset the equalizer to default settings.
icon on top of the screen can be used to reset the equalizer to default settings.
Note
This equalizer will be applied to both stereo songs and all tracks of a multitrack song. It is meant to adjust the sound to a room.
Master Effect (iOS only)
Selecting this option will open a list of all 3rd party AUv3 effect plugins installed on your device. By selecting one of these plugins, it will be placed in the signal path (see Signal Path) right after the master equalizer before the audio output. You can edit the plugin settings by tapping on ![]() . To close this view, tap on Close. The On/Off button can be used to compare the processed signal with the unprocessed signal.
. To close this view, tap on Close. The On/Off button can be used to compare the processed signal with the unprocessed signal.
Note
If you use multitrack files, the master effect plugin will only be applied to signals routed to the same output as the stereo song playback. Make sure you don't use any effects with a high latency as this will delay signals on the main bus in relation to signals on the auxiliary busses.
Fade Settings
Play Button Fades

These two sliders control how fades are applied when you start or stop the playback.
Resuming playback in the middle of a song will fade in when the Fade In time is set to greater than zero. When you start a song from the beginning, the fade in time is ignored and the playback starts with full volume.
Setting a Fade Out time greater than zero will fade out a song instead of stopping immediately when you manually pause a playback. You can abort the fade by tapping a second time on the stop button.
Crossfade

Crossfades can be started manually or automatically.
When the option Apply to Continuous Playback is on and you have also enabled autoplay for a song or the playlist/queue, the transition to the next song will be performed with a seamless crossfade of the specified length. Crossfades have no effect if you are not using autoplay.
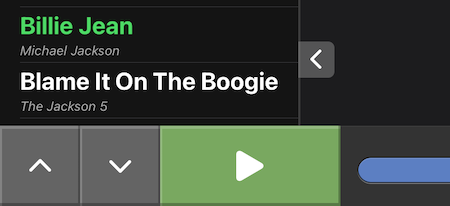
Enabling the option Show Crossfade Button will allow you to initiate manual crossfades during playback. The main player view will display a crossfade button in the lower right corner of the lyrics display:

This button can be pressed during playback to immediately crossfade to the next song in the queue.
A crossfade has a Fade Out time setting for the currently playing song and a Fade In time setting for the next song.
Playback Settings
Start Delay
If you want to delay playback start you can set a time with this slider. If you press the play button at the beginning of a song, the button will change the color to yellow and will delay the playback start by the selected time. Pressing the button again, will cancel the playback start.
Note
This setting has no effect if you start playback in the middle of a song.
Double Tap to Start
When enabled, you need to double tap on the start button to start the playback. This can be useful to ensure that an accidental tap on the screen does not start the playback.
Stop Button Mode
Here you can specify what action should be performed when pressing the stop button during playback. It is possible to pause the playback at the current position, rewind the current song to the start or jump to the next song in the queue.
Note
If you activated Fade Out, then the playback will continue for the specified fade out time while the volume is being faded. You can abort the fade by tapping a second time on the stop button.
Double Tap to Stop
When enabled, you need to double tap on the stop button to stop the playback. This can be useful to ensure that an accidental tap on the screen does not stop the playback.
Stop at End of Playlist
Normally Stage Traxx will repeat a playlist if it ends and Autoplay is enabled. When this setting is turned on, playback will always stop at the end of a playlist.
Manual Stop at End of Region
If you enable this setting and press the stop button while the playback position is within an audio region, playback will continue until the end of the region and stop there. This is useful if you have parts where you interact with the audience. Once done press play again to resume playback. You can stop immediately by pressing the stop button a second time.
Note
There will be no fade out done before stopping.
Autoload Next Song
This option is usually enabled and will load the next song into the player when the current song is finished. Disabling this option will not load the next song automatically. You will need to select the next song manually.
Note
Loading a song into the player does not mean that playback will start automatically. Playback only starts automatically if you have the Autoplay option enabled for the current song or the whole playlist.
Speed Step Size
You define the step size for changing song speed via pedal presses. One press of the pedal command will increase or decrease the song speed by the selected value.
Note
This setting is only used if you configure pedal buttons to change the song speed.
Volume Step Size
It is possible to define how much the volume is changed when using remote commands or assignable buttons for volume changes. Each pedal or button press will increase or decrease the volume by the selected value.
Note
This setting is only used if you configure pedal or assignable buttons to change the volume.
Seek Step Time
You can define by how many seconds the play position will jump forward or backward when using the seek remote command or assignable buttons.
Note
This setting is only used if you configure pedal or assignable buttons to seek forward or backward.
Waveform Seek during Playback
The waveform slider can be used to quickly seek to a certain position in the audio file. This functionality is usually locked during playback to prevent accidental jumps in the playback. Enabling this option will disable this lock and enable position changes during the playback just by sliding with a finger on the waveform view.
Store Mutes during Playback
When enabled and you enable or disable mute for a track of a multitrack song during playback, this change will be remembered the next time this song is loaded. If you disable this setting, you can change track mutes during playback without these changes being stored. To setup default mute settings you then need to use the song details view.
Semitones
Transpose all regular songs in your library by the specified number of semitones. Chords will be transposed if the transpose feature is enabled.
Cents
Each semitone is divided into 100 cents. You can adjust the fine tuning for all regular songs with this slider.
Virtual MIDI Output
To send MIDI to other iOS apps, an app can either create a virtual listening port or listen to virtual sender ports from other apps. Stage Traxx sends MIDI commands to all listening ports it finds and does also create a virtual output that can be used by apps that do not have their own listening port.
If another app creates a virtual listening port and also receives message from virtual sender ports from other apps, that app will receive each MIDI message from Stage Traxx twice. Disabling this option will prevent this situation.
On the other hand, if an app does not receive MIDI commands from Stage Traxx, make sure that this option is enabled.
MIDI Output Ports
This will open a list of all detected MIDI output ports. You can disable certain ports to prevent Stage Traxx from sending MIDI messages to that port.
Send Midi
You can define MIDI commands to be sent whenever a new song is loaded into the player, the play / stop button is pressed or playback ends. This setting will apply for all songs. If you define song specific commands for play and stop, they will be merged with the commands you define here. The Action 1 and Action 2 entries are used for when you map the remote actions Send MIDI Action 1 or Send MIDI Action 2 to your pedals or the assignable buttons.
The command syntax is the same as described in the Send MIDI section.
Example: Enter START,PC1@1 to send the midi start command together with a program change.
You can use the Learn button to automatically learn the correct MIDI command to use. When tapped, Stage Traxx will wait for incoming MIDI commands.
Sync
You can choose whether Stage Traxx should send MIDI Timecode or MIDI clock during song playback. Please see Synchronizing MIDI devices for details.
Internal Sample Rate
The audio engine in Stage Traxx runs with a fixed internal sample rate. Files with a different sample rate are automatically converted to the internal sample rate during playback and the same happens for audio interfaces that do not run with the internal sample rate.
To avoid unnecessary sample rate conversions it is recommended to select the sample rate most of your audio files use as the internal sample rate.
Stage Traxx can run with a sample rate of 44.1kHz or 48kHz.
Multitrack Playback
Synchronized playback of multitrack files can only be guaranteed when all tracks are using the internal sample rate. Make sure you don't mix different sample rates in multitrack songs.
Buffer Size
You can change the buffer size for rendering audio. Smaller sizes will lead to quicker responses to start / stop commands but leads to a higher system load and can cause audible clicks on slower hardware. If you experience clicks during playback, try to increase the buffer size.
Note
If Stage Traxx is running within an Audiobus session, this setting is ignored.
Pause in Background
Stage Traxx will try to preserve as much battery on your device as possible. This means that the app will enter sleep mode when you switch to another app while no playback is running. By disabling this option the audio engine will keep running even if no playback is running. This means that the app will never sleep. This might be useful if you want to control the app via MIDI while it is running in the background. The downside is that it will drain your battery faster.
Audio Routing
Audio Device Setup
Stage Traxx can route signals to different outputs. In this section you can specify which output to use for stereo songs. If you choose a mono output, the stereo files will be summed to mono.
On iOS: When you activate the Option Combine USB & Headphone Outputs you will be able to use the headphone output of your iOS device in addition to a USB interface connected to the lightning port. This will allow you to use two separate stereo outputs with only a stereo USB interface. Please note that this operating mode does not support lightning audio adapters and Bluetooth or Airplay output.
Multitrack Outputs
You can select a mono or stereo output for each of the 8 tracks of multitrack songs. If you select a mono output for a track, stereo files on that track will be summed to mono. It is also possible to disable the output for a certain track.
Tip
Disabling the output for a track is a very useful feature if you play in different band setups. If track 1 for example is always the drum track and you play a gig with a drummer, you just need to disable the output for track 1 to mute the drum track in all your songs. Then, when playing without a drummer, just select a output for track 1 again to unmute it in all your songs.
Multitrack Naming
Each track can be named. You should use this feature early to make sure that the same instruments are always loaded into the same tracks. Although this is not a necessity, it will greatly simplify routing and adjustments for different band setups (see Multitrack Outputs).
General
User Interface
Dark Mode
By default Stage Traxx will run with enabled dark mode. This mode has a dark screen background with light text and is suited for performances on a dark stage. If you perform in a light environment you might want to switch off dark mode. The app will then use a light screen background with dark text which improves readability in sun light.
Color Settings
You can customize the color settings for different parts of the app. The Tint Color is used to highlight certain elements in the user interface. The Text Color will be used as the main color for lyrics. The Highlight Color is used for highlighting the current phrase in time coded lyrics. The Chord Color will be used to render detected chords in the lyrics area and Chord Highlight Color is used for highlighting the current chords in time coded lyrics.
You can also change the color of the different song list markers with the options Current Song Marker Color, Next Song Marker Color and Played Song Marker Color. The markers have an additional grey color option to make them less obtrusive.
List Font Size Modifier
You can increase or decrease the font size in the song list and playlist views.
Clock Mode
The clock display in the top left corner of the lyrics view can be used to display the current time when you select the Clock mode.
When selecting the Timer mode a timer will be displayed. The timer will start running, when you start playback of a song. It will keep running until 10 minutes after the last song stopped playing. This timer is useful when measuring the total time spent in a set. You can stop and reset the timer by tapping on the time display.
In the Queue End mode the approximate end time of the queue will be displayed. This is useful if you have a fixed time when you need to finish your current set.
The mode Song Timer will always display the inverse value of the song timer on the right hand side. This means if you show the elapsed time on the right hand side, the left timer will display the remaining time and vice versa.
Note
The clock is not displayed in portrait orientation on iPhones.
Hide Songlist in Playback
If this option is active and you start the playback in the main player view, the song list on the left hand side will automatically hide and reappear once playback stops.
Assignable Buttons
You can activate two buttons with various functions on the left side of the play button in the big player view. Following functions can be assigned to these buttons:
- Change volume
- Scroll half page up or down
- Scroll full page up or down
- Change current song pitch
- Change current song speed
- Move song selection up or down
- Mute and unmute volume
- Seek 10 seconds forward and backward
- Jump to the next audio region and toggle the loop for the current audio region
- MIDI actions 1 and 2
Tip
If you keep the button pressed, the assigned action will be triggered continuously.
Show Next Song Title
Enabling this option will add the title of the next song to the current song title in the main player view. This is useful if you use the main player view without the song list opened. You will then always see which song is scheduled to play next.
Allow Song Editing
You can decide wether the detail disclosure icon ![]() should be displayed in the main player view beside each song. Tapping on this icon opens the song details view. If you don't need to edit songs during gigs, you can hide this icon to have more space available for the song title.
should be displayed in the main player view beside each song. Tapping on this icon opens the song details view. If you don't need to edit songs during gigs, you can hide this icon to have more space available for the song title.
Song End Indicator Time
You can adjust the time the waveform view flashes before a song ends. It is possible to completely disable the flashing by setting the time to 0.
Add Songs on
Here you can choose whether songs added to a playlist will be added on top or to the bottom of the playlist.
Show Song Numbers
If enabled, all songs in a playlist and on the history tab will be prepended with a number:

Disable Screen Lock
This setting will disable the automatic screen lock of you device so that it will not switch to standby as long as Stage Traxx is running.
Drag & Drop Sorting
It is possible to sort songs in the Queue and Playlist views via drag and drop. To prevent accidentally triggering this function during a gig you can disable this sorting mechanism. Playlist items can still be reordered in edit mode but queue items can only be reordered via the slide right gesture menu if this option is disabled.
Show DONE Marker
Stage Traxx remembers played songs in the History tab. Enabling this option will show all songs that can be found on the history tab with a purple background color.
Lyrics & PDF
Show Lyrics/PDF on Play
When activated pressing play on the mini player will start playback and open the big player view with the lyrics and pdf viewer.
Show Lyrics/PDF on Playlist Add
When activated loading a playlist into the queue will also open the big player view with the lyrics and pdf viewer.
Note
This option only has effect if Advanced Queue Mode is enabled
PDF Scale Mode
When displaying a PDF document you can either view the document in full width mode, in full height mode or always display two pages side by side. Stage Traxx will automatically zoom the document accordingly.
Centered Text
Enabling this option will center lyrics horizontally.
Fixed Font Width
Use a fixed width font to display lyrics.
Default Font Size
You can specify which font size should be used by default when adding new songs to Stage Traxx.
Note
This setting will not change the font size for existing songs.
Device Size Modifier
If you work with multiple devices with different screen resolutions you can use this setting to adjust the font size of all songs with the selected size modifier to fit to the screen of the current device. This will ensure that all songs will look identical on different screen sizes.
Auto Adjust Editor Font Size
When enabled, the lyrics editor will use the font size configured for the edited song. When disabled the editor will use the standard system font size.
Hide Chords
When enabled Stage Traxx will hide all lines containing chords.
Chord Size Modifier
You can change the font size for chords. They can be displayed smaller or larger than the regular lyrics.
Transpose Chords
Stage Traxx will automatically transpose chords in lyrics when this setting is enabled and you change the pitch of a song.
Prefer Symbol on Transpose
When transposing chords, Stage Traxx will always use the the same chord symbol as the base chord. This means if you have a # or b symbol in the base chord, the transposed chord will have the same symbol type. If the base chord has no symbol modifier, you can select which symbol Stage Traxx will prefer on the transposed chord.
Lyrics on External Screen (iOS only)
If you connect an external monitor via HDMI you can either mirror the iPad screen by disabling this setting or show lyrics only on the monitor if this setting is enabled.
Hide Chords on External Screen (iOS only)
When enabled, chords will not be displayed on the external. This setting works independently of the hide chords setting above so that you can setup the external screen independent of the internal lyrics display.
Show PDF on External Screen (iOS only)
It is possible to disable showing pdf files on the external screen. When disabled, the external screen will fall back to showing the text based lyrics for a song even if a pdf document is shown directly on the device.
Font Size Modifier (iOS only)
Stage Traxx can display lyrics on an external monitor. To adjust for the resolution of that monitor, you can set a factor to increase the font size defined for a song. A setting of 1.5 means that a 20 point font will be increased to 30 points on the external monitor.
See Display lyrics on external monitor for details how to use external monitors.
Screen Rotation (iOS only)
The external screen can be rotated 90 degrees to the left or right if you prefer working with a rotated screen.
Autoscroll Lyrics
When enabled, Stage Traxx will automatically scroll the lyrics view in the main player and in network client view. When this mode is active, the speed can be modified via the stepper controls below the lyrics view or by time coding lyrics. Stage Traxx remembers the individual scrolling speed of each song. See Using automatic scrolling for details on setting the correct speed.
Note
The following settings will only be visible when Autoscrolling is enabled.
Autoscroll PDF
Enable this option if you want PDF documents without timecode to scroll automatically. You can then change the scrolling speed with the speed stepper control similar to text based lyrics scrolling.
Manual Scrolling Override
When enabled you can scroll the lyrics view during playback manually. This will disable the automatic scrolling and will be indicated by the label manual above the scroll speed steppers:

To reenable automatic scrolling tap on the label manual.
If this option is disabled, manual scrolling during playback will not disable automatic scrolling. So when you lift your finger, the view will snap back to the current scrolling position.
Highlight Current Line
With time coded lyrics, Stage Traxx can highlight the current lyrics segment if this option is enabled.
Highlight Mode
The mode Color will change the color of the current lyrics segment to the selected highlight color. The mode Brightness will increase the brightness of the current lyrics segment. This might be useful if you use colored lyrics sections as this mode will not change the color of these sections.
Current Line Position
With time coded lyrics, Stage Traxx will always try to position the current lyrics segment at the selected position within the lyrics view.
Default Scroll Speed
You can specify the default scrolling speed for new songs added to Stage Traxx.
Note
This setting will not change the scrolling speed for existing songs.
Queue
Advanced Queue Mode
If Advanced Queue Mode is disabled, Stage Traxx will automatically add and remove songs to and from the queue for you. You just select a song in the song list or in playlist view and Stage Traxx will load it into the player. If a playback is running while you select a song, it will be added as the next song to play.
In most cases you don't need to access the Queue at all in this mode. Therefore the option Show Queue Tab is disabled by default. You can enable it to view the contents of the queue as a separate item in the tabbar.
If you want more control about song selection for the queue, enable this option. Now you will need to handle the queue manually.
Note
Some options only apply if Advanced Queue Mode is active.
Double Tap to Enqueue
By default tapping a song or playlist will add them to the queue. To prevent accidental triggering you can enable this option. You will then need to double tap on songs or playlists to add them to the queue.
Default Queue Add Position
You can choose at which default position a song should be added to the playback queue. Bottom will always append a song to the end of the queue. Top will add the song to the topmost position in the queue. This means that if there is no running playback, a double tap will insert the song in the first position and will also load it into the player. You can then start playback of this song right away. If playback is running, the song will be inserted in the second slot which means that it will be armed for playback once the currently playing song finishes.
Network Sessions
See Network Sessions on details about how to use this feature.
Session Name
You can set a custom name for your session that will be displayed when network clients try to connect to your device. Changes will only be visible for network clients after you restart the app.
Host Session
Enable this option to start hosting a network session.
Join Session
Shows a list of all devices hosting a session on the current WiFi network. You can connect to a host by tapping on its name. This will open a lyrics view which displays the active song on the host device.
Show Local Lyrics
If this setting is enabled, your own lyrics will be shown when connected to a network host. The matching is done via title and artist tags. So in order to be able to view your own lyrics instead of the lyrics of the host, make sure that your song titles and artist tags match.
Send PDF Documents
PDF documents can get quite large when working with scanned documents. Sending large PDF documents over the network to multiple clients can take a lot of time. You can disable sending PDF documents to network clients if you experience slow song switch times on the network clients.
Remote Control
Details about remote control of Stage Traxx can be found in the section Remote Control.
Assign Actions
All actions that can be remote controlled via MIDI or Airturn compatible devices are listed on this page. To assign a pedal to an action select the action and tap on the pedal you want to assign. Delete an assignment by swiping to the left or using the right click context menu on a Mac.
Airturn Setup
On this page you can enable or disable Airturn support. It will list your connected devices and you can open a small troubleshooting view by pressing i which will show you if the key presses on your device are successfully detected.
Note
If you use Airturn compatible devices that act as a virtual keyboard, you need to enable Airturn and select Keyboard as the connection mode.
Bluetooth MIDI Devices Setup
Stage Traxx can use Bluetooth LE MIDI devices like the IK BlueBoard directly. This dialog can be used to connect to these MIDI devices.
Sync
It is possible to automatically sync multiple devices with iCloud. See Cloud Sync for details on how to use this feature.
Backups
Here you can create and restore backups. See Backups for details on how to use this feature.
Store
In App Purchases
Here you can unlock the full version of Stage Traxx through an in app purchase. The purchase is tied to your Apple ID. Purchasing the full version will allow you to use it on any device you operate under your Apple ID. You can restore your purchases an new devices by tapping on Restore Purchases.
Note
You need internet access to make and restore purchases.
It is also possible to send tips to the developer if you are feeling generous. Tips are so called consumeable purchases which means you can repeat them as often as you like. They will not enable any additional functionality in the app.
Info
Show Stage Traxx 3 Files
Will open the Stage Traxx 3 document folder in the Files app on iOS or Finder on Mac.
Create Support Email
Will create a new email to Stage Traxx support that contains log files to help analyze a problem. Please use this option when asked by support to send log files.
Note
You need Internet access to use this option.
Online Manual
Will open this documentation in a browser.
Note
You need Internet access to use this option.
Help Forum
If you have any questions regarding Stage Traxx please take a look at the support forum.
Note
You need Internet access to use this option.
About
A list of all third party libraries used in StageTraxx including their licenses.
Version
Displays the current version and build number. This information is useful when contacting support.